|
Its springtime once again and that means that its time to get out of the house and into the workshop for the upcoming Halloween season! Last year, our Grave Grabber motorized prop went over really well with both our patrons and the public alike. This year, I thought that I would build another, bigger Grave Grabber, and here is how it is done.
Parts you will need:
- One scary head and hands
- One 2x4x8 length lumber
- Three lengths of 4 ½ aluminum stock
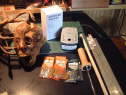
- One Webber rotisserie motor
- Eight #8 5/8 bolts
- Eight #8 nylon lock nuts
- Twenty four #8 washers
- Fifty wire ties
- One 4 ½ wooden dowel
- Two wire coat hangers
- 10 of burlap fabric
Tools you will need:
- Skillsaw or handsaw
- Hacksaw and metal cutting blade
- Screw gun and 2 screws
- Wire cutters
- A metal file
- 7/32 drill bit
- Tape measure and pencil
- One can Great Stuff spray foam
- 2 cans of spray paint; red primer and flat black
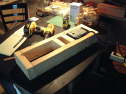
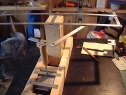
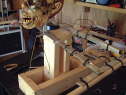
Step One: Building the base.
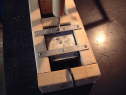
Measure and cut the 2x4 into two 20 and two 6 ¾ pieces, screw them together to form a box. The resulting shape should be just big enough for your rotisserie motor to fit into snugly (fig. 2). Cut two additional blocks at 3 ¼ and wedge them into the box (fig. 3), these will act as the upright and servo tray supports. Cut two 10 ½ inch pieces and a 5 piece of the 2x4, screw them to the front 3 ¼ block as shown to serve as the upright support.
Cut two 6 pieces of ½ aluminum stock, drill and use to mount your motor to the base. Leave enough room at the back for your hand to reach the switch located at the bottom-rear of the motor. (fig. 6)
Step Two: Building the linkage & mechanism. (see schematic)
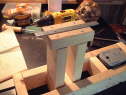
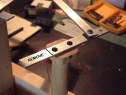
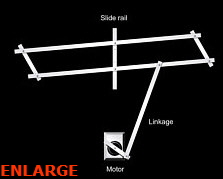 Cut a 6 piece of aluminum stock to act as the slide rail. Drill two 7/32 holes and connect the rail to the upright support using 2 screws, there should be a 1 overhang on both sides. (fig. 4) Cut a 6 piece of aluminum stock to act as the slide rail. Drill two 7/32 holes and connect the rail to the upright support using 2 screws, there should be a 1 overhang on both sides. (fig. 4)
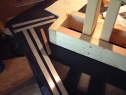
Cut two 30 and 7 pieces of aluminum stock. Drill holes at the corners, while leaving an extra 2 overhang on the 7 pieces (fig. 5). Use the 5/8 #8 bolts, washers and nylon lock nuts to assemble the mechanism, do not over-tighten. Drill two holes into the center of the 30 pieces and mount the mechanism to the rail with bolts, washers and nuts (fig. 8). Use a metal file to round off any sharp edges on the aluminum.
The rotisserie motor comes with a few useful items including the wooden spit handle which is press-fitted into the shaft. Remove the metal end cap, and it is perfect for attaching the 4 link to the shaft (fig. 7). Cut the shaft to 10 and place into the motor. Cut a 10 piece of stock, bolt one end to the shaft and the other about 1/3 of the way from the left side of the back 30 mechanism piece (fig. 8). Once assembled, oil all of the connections before turning your motor on and checking the action, this is also a good time to do any adjustments by drilling extra holes and experimenting with the linkage placement.
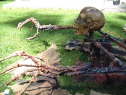
Step 3: Getting your ghoul on.
Cut the ½ dowel into two 20 lengths. Use wire ties to attach them to the short sides of the mechanism arms. You should have an extra length of aluminum stock, fold this along the center and flare out the sides, drill and bolt onto the front length of the mechanism (fig. 9). This will act as the neck so be sure you are happy with the height once the head is on. The hands are made from wire coat hangers, electrical tape and spray foam, they are very light weight. Connect them to the ends of the dowels securely with wire ties. The ½ aluminum may start to sag a bit under the weight, so wire-tie on some extra material if needed to brace the 30 pieces (fig. 10) (I used a 25 piece of stock aluminum on the rear and the remainder of the shaft on the front).
Cut a wire coat hanger as long as you can make and use it to form the linkage guard, this will prevent your linkage from getting tangled with the robes and provides the spine for your ghoul (fig. 10). (Instead of cutting off the excess wire, I attached it to the head of my ghoul for a bit of secondary action. I also used another length of wire to form the sternum.)
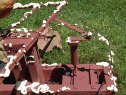
Use Great Stuff spray foam along any sharp edges of the aluminum and base, as well as a small amount on the wire making sure not to get any into the connections or impeding the movement. Once the foam has dried, coat the entire structure with red spray primer or flat black. Use tan and brown enamels with a sea sponge to add the highlights and match the head as closely as possible (fig. 15).
Step 4: Finishing touches
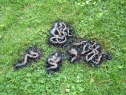
You may want to use the spray foam to make entrails. It is pretty simple; spray some foam on the ground, let dry and paint. Attach to your creation where required for hiding edges and adding gore (fig. 16).
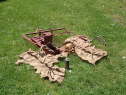
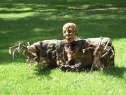
The robe is made from just 4 pieces of burlap, one for each arm, one for the chest and a large one for the cape. The burlap is easily attached with wire ties, but be sure that your creature has full range of motion before making any permanent connections.
The weathering process can be done whatever way you feel comfortable doing. Green and brown spray paint on the burlap works well for this or remove the motor and store outside in the elements for a few weeks. Feel free to add hair, vines or more foam to make your creation as hideous as inhumanly possible.
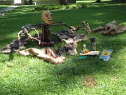
Conclusions:
Overall, this is a very easy prop to build; I took my time and had a working prop in about 16 hours. The effect is pretty realistic and will add a new and subtle movement to any static graveyard scene. The motor will give you hours of creepy operation provided that you not leave it out in the rain or let it run for more than a few hours at a time. If you have the technical knowledge, you may want to speed it up with a wiper motor or connect it to a motion sensor for added effect.
enjoy,
-=k
|