|
Stir yourself up some culinary magic by building a human rotisserie!
Parts:
One rubber skeleton
one metal shower curtain rod
6 lengths of pressure treated 1X1 deck spindles
2 1/2 U-brackets
one 10 length 9/16 all-thread rod, nuts and washers
Tools
a hand saw
a screw gun and 2 screws
one can of Great Stuff spray foam
2 cans of spray paint (black and red primer)
12 wire zip ties
Step one: prepping the main course
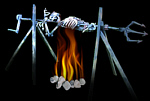
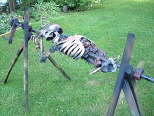
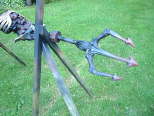
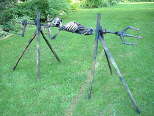
I decided that a half skeleton was scarier than one with legs so I tore them off and inserted the shower curtain bar (spray painted black) through the pelvis and rib cage and secured the meal to the bar with several zip ties and then with 1 screws to keep the victim from turning on the shaft. I added meat by spraying the Great Stuff foam onto a patch of grass, letting dry and spray painting black. I was very pleased with the result of the bubbling mass. Once the foam had dried, I stuffed the upper torso with it (fig. 1). The arms were zip-tied to the bar in a convincing manner then tied with some old rope. I used the end of an old plastic pitch fork (fig. 4) for added skewering power and painted it to match.
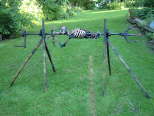
Step two: Building the frame and handle
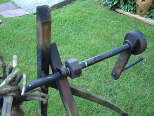
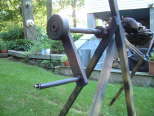
I constructed two identical but opposite tripods out of the 1x1 spindles. The skewer is the closet rod attached to the tripods using the U-brackets (see fig. 2) 2 small sections of Water Noodle extruded foam were used to keep the bar from wandering as the spit gets turned. The handle was constructed from some old wood, a length of all-thread rod and some assorted 9/16 nuts and washers, the handle itself is an 8 length of 1/2 PVC pipe slipped over the threaded rod. The round wheel (fig. 3) is from an old shopping cart (we NEVER throw anything away!), securing the handle firmly to the bar flange required me to use 2 screws and the handle was only 1/2 thick, so the wheel just gives me something deeper to screw the flange and handle to. Once complete, the body is easily turned with the handle and really looks creepy!
Step three: painting and final assembly
After all of the parts were assembled and in good working order, I used spray foam to cover up and hide the screw heads, zip ties and to add more gore to my skeleton. When dry, the foam was coated with black spray paint. The skeletons back was hit with a heavy coating of black spray to look as if it had been sitting over the fire for too long and was now well-done. The meat was then given a fine misting of red spray primer to bring out the finer details. I also coated most of the skeleton with some gloss spray acrylic to give it a juicy appearance. Also because I love the smell of spray paint on a warm summer night...
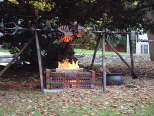
Step four: faux flame and motor
Well, I was lucky enough to score a rotisserie motor from a buddy of mine, we now have a slow and creepy motion going in this little corner of our haunt! I also made a flame unit from some thin orange fabric, an old window fan, a few spotlights and colored bulbs, and more than a few bricks. I dont really have a How-to on the flame unit, but I do have a poorly done schematic that illustrates the basic construction here for more information about faux flame, visit Monsterlist. I must say that I am very pleased with the end result! lemme know what you think!
Happy Haunting!
-=k
|