|
We had decided that our 2006-HauntForum.com Tournament DeTombstone entry would be one of our best ever... and we've cranked out quite a few creative gems.
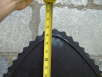
Keeping the 42" height restriction in mind, we decided on a gothic style to the tombstone, measured the pink foam to 39 and cut away the excess.
To give the stone more dimension, we purchased, cut and molded a couple of pieces of lawn edging to frame it, we just loved the spikey effect. We wanted to keep the creepy, gothic theme going... but how? A couple of years ago, we took a road trip in July to Worcester, Mass to visit Fright Catalog's outlet store. Talk about kids in a candy store, but I digress... with hundreds of dollars worth of loot picked out, we further spoiled ourselves with this large creature (see construction gallery)- perfect to loom over the ToT's from the eaves of the house! We loved his muscular physique (okay, I didn't but my partner, Laurie, did) and thought we could recreate it. But how? With its purchase price of $150, we didn't want to risk damaging the original, so we settled on forming the torso and limbs with chicken wire and then a coating of papier mache.
We quickly found out that dripping wet newspaper doesn't stick to chicken wire - who knew? So we took a shot with paper towels and spray adhesive and - voila! It worked like a charm! We then applied a couple of layers of mache.
We loved the gargoyles feet and hands so we burnished heavy duty aluminum foil over the original. Since the feet were positioned so close to the hands, we did have to mache them separately.
Here's where patience turns out to be a virtue... each layer must be dry before the next is applied and to keep the gnarly look, the newspaper had to be shredded into 1/4" pieces and applied one at a time.
Now for the head... of course, we felt that it just wouldn't be creative enough to simply duplicate the head of the Gargoyle, but what head to use? We rummaged through our collection of severed heads and after much discussion (ok, it turned into a debate, but that's in the past, right?) and decided on a $20 head purchased from Alarming Products last year.
We foiled the poor bastard and mache-ed away... we followed up with a final coat of paper towels.
Now it was time to secure the body to the base and attach the hands and feet to the arms and legs. This took a little tweaking (actually, it took a lot of tweaking, some swearing, a wooden dowel and two screws but what the heck?)
Once together, we taped the seams - a layer of mache later, it was time to attach the head. After some more discussion/debate, we filled a plastic grocery bag with newspaper, stuffed it into the empty mache head and used more paper to blend the seams.
Using some leftover foam, we cut two slabs for the stone base for the demon; applied a generous amount of PL and screwed them together. We dry fitted the hands and feet so that they would appear to be crushing the stone with their mighty talons! Leaving the foil under the mache made them especially pliable as we carved the base with some cracks and fit the hands.
We felt it best to hit the body with a coat of black spray paint first - this would give it an extra bit of strength and keep the crevices dark for the top coating of dry-brushed gray. We then decided that a coat of black latex would further even out any stray newspaper lines.
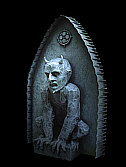
We rolled the tombstone out with black latex and after pre-drilling holes in the lawn edging for the screws, spray painted it black as well. A little more PL and some strategically placed screws and it was ready for the gray coat. At first we tried sponging the gray on, we didn't like the effect and painted over the 'mistake' with more black. We settled on a ragging technique using small squares of a terrycloth towel. Apply the gray in two or three layers, leaving just a bit of black showing through here and there for a mottled effect. The edging was dry brushed with gray. A dry fit of the demon and we decided to paint a black shadow that would add more dimension. Once everything dried, we attached the base of the demon to the base of the stone with some PL and screws. Finally, the gray dry-brushing was applied in even, light coats over the entire prop. (see construction gallery)
Time for aging.... we used a couple of colors of green spray paint. We sprayed water first and then a mist of paint, allowing it to run and drip. The finished effect is very realistic...
by Laurie
|